Putting together a skateboard is key for those who love the sport. It lets you make a board that’s just right for you. This means whether you’re making a custom board or a cruiser, knowing how to build it matters. Our guide gives you detailed skateboard assembly instructions.
It makes sure you combine each piece the right way. This is for the best performance and safety. We’ll show you how to put on grip tape, attach trucks, add wheel bearings, and make final tweaks. With our steps and video tutorials, you’ll become a pro at putting skateboards together.
Using top-notch parts and getting the setup right are important. Take the Meow Skateboards Big Cat Soft Top White Mini, which costs $79.99. It shows the importance of strong parts. Then, there’s the Landyachtz Skateboards Tony Danza Texture Flow Longboard for $239.99. It’s a great example of quality and strength.
To find out how long skateboards last, check out this link.
Gathering Your Skateboard Components and Tools
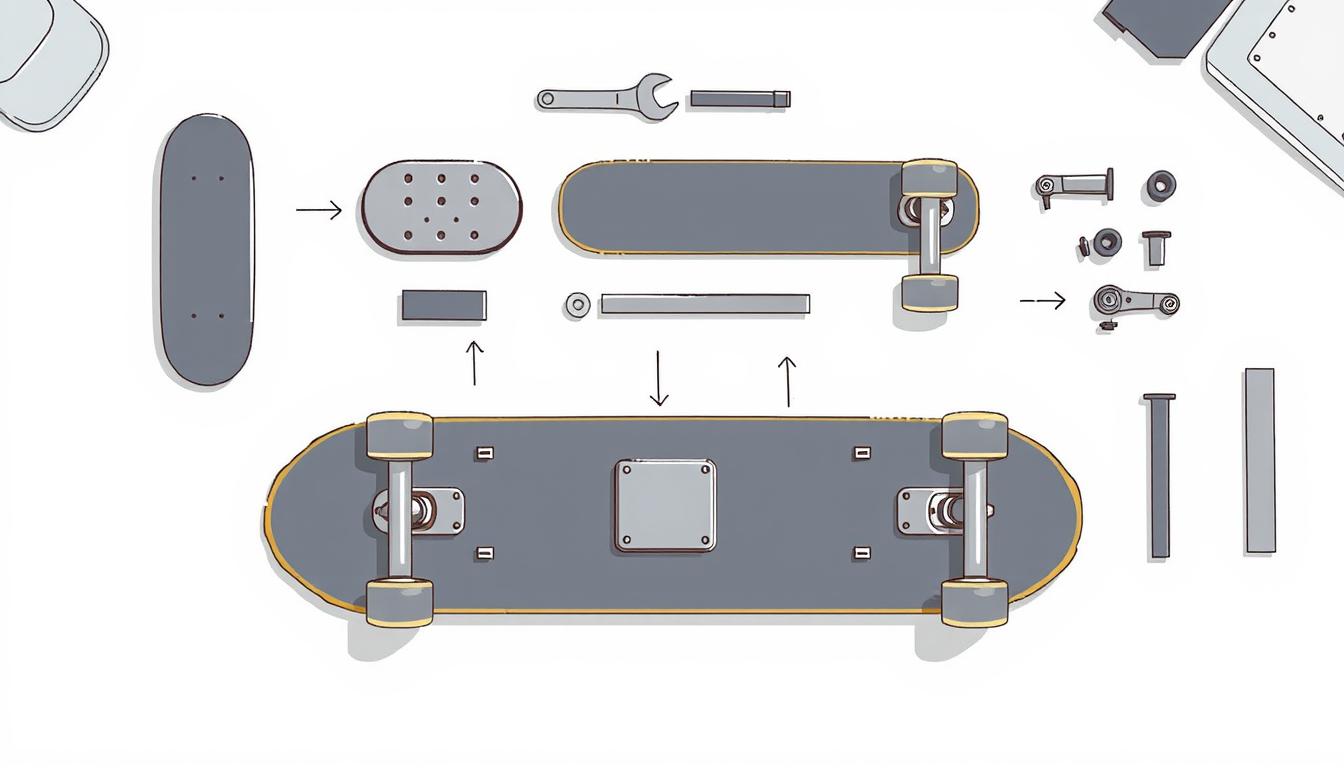
Before you start putting together your skateboard, make sure you have all the parts and tools ready. Having everything you need will make the assembly process easier. It also helps your skateboard perform better.
Essential Skateboard Parts
First, gather the main parts: the skateboard deck, trucks, wheels, bearings, grip tape, and hardware. Choosing quality parts improves your skateboard’s performance. Look for top brands like Meow Skateboards and Powell Peralta.
- Skateboard Deck: The deck is where you stand. It usually measures around 8.25″.
- Trucks: Attached to the deck, trucks hold the wheels. They should nearly match the width of your deck.
- Wheels: Wheels vary in size and hardness, affecting ride quality. They last for months before needing replacement.
- Bearings: Bearings help wheels spin smoothly. With proper care, they can last from a few months to over a year.
- Grip Tape: Applied on top of the deck for better grip.
- Hardware: This includes eight screws and nuts to fix the trucks to the deck.
Necessary Tools for Assembly
You’ll need certain tools for skateboard assembly:
- Screwdriver: A suitable one for your hardware bolts. You might need both Phillips and Allen wrenches.
- Skate Tool: A multi-function tool for adjusting parts.
- Razor Blade: For cutting the grip tape correctly.
A full set of tools helps you put together your skateboard correctly. For more about why skateboarding is great, click here.
High-quality parts and the right tools make a durable skateboard. Building a skateboard costs about $90 to $150, depending on your choices. Also, check out skate wear like hoodies and T-shirts. They have cool offers, like the 3FOR2TEE discount.
How to Assemble a Skateboard: Step-by-Step Guide
Starting to set up a skateboard means you need to be well-prepared. First, set up your workspace and organize your parts. We’ll walk you through making a great setup space. This helps you focus and be precise, making assembly easy.
Preparing Your Workspace
Choose a flat, clean spot without distractions. This helps you stay focused and make no mistakes. Make sure you have bright lighting and space to spread out your tools and parts. A good workspace helps you avoid interruptions and think clearly while you build.
Organizing and Checking Parts
Getting your parts in order is key when setting up a skateboard. Check that you have everything you need and it’s all in good shape. This includes the deck, trucks, wheels, bearings, grip tape, and hardware. Knowing the front and back of the deck helps you not get mixed up. It’s also key to make sure all parts work together, especially for custom skateboards.
- Deck: Pick a deck that fits your foot size. If you have big feet (size 12 or more), you need a deck wider than 8 inches. For smaller feet, a deck 8 inches or less is good.
- Trucks: Make sure the trucks match the width of your deck.
- Wheels: Choose wheels that fit how you skate. Use smaller wheels for street skating and larger ones for cruising or bowl skating.
- Bearings: Good bearings make for a smooth ride.
- Grip Tape: Check the grip tape for right size and quality before putting it on.
- Hardware: Check if you have the right size and number of screws and nuts.
Learning how to set up a skateboard makes it less overwhelming for new skaters. You might pick a beginner board like the Powell Golden Dragon Flying Dragon 2 or go for top-notch parts. Getting help from a friend or a skate shop expert in choosing parts is a good idea. For more help, check out thisguide on finding the frontand back of a skateboard.
By taking these steps to prepare, you make sure building your skateboard goes smoothly. This leads to a rewarding and enjoyable experience putting it together.
Applying Grip Tape to Your Skateboard Deck
Putting grip tape on is key when setting up your skateboard. Learning how to apply grip tape the right way means better grip and a board that lasts longer.
Aligning and Placing the Grip Tape
First, pick a grip tape that fits your board’s size. Options like Pepper Grip Tape Co Black Griptape (9″ x 33.5″), Opera Skateboards Mask Die-Cut Black Griptape (10″ x 33″), and Jessup Grip Tape Ultra White Griptape (9″ x 33″) are great. These choices work for both smaller and bigger boards.
Start by removing the backing to show the sticky side. Line it up on your board from end to end, making sure it covers the whole deck. Slowly press it down from the middle to the sides, using foil or hands to make it smooth. If you see any air bubbles, you can pop them with a cutter.
Trimming and Smoothing the Grip Tape
After the tape is on, it’s time to cut off the extra bits. Use a sharp blade for this, cutting neatly around the board’s edge. Keep your blade angled slightly for the best cut. Then, smooth the edges with leftover tape pieces or a file. This helps the grip tape stick better and last longer.
Applying grip tape right is very important. It ensures your board performs well and gives you the grip you need for skating.
Mounting the Skateboard Trucks
Putting on the skateboard trucks is key when you’re assembling your skateboard. After you’ve applied the grip tape, you move on to attach the trucks to the deck. It’s important to pay close attention, making sure each part is fastened well. This ensures your ride is both smooth and stable. Start by putting the bolts through the deck, and don’t forget to use the washers, bushings, and nuts needed for the kingpin setup.
Make sure the trucks’ kingpins point inward towards each other. This is crucial for the skateboard to move right. Each truck comes with six holes in its baseplate. Two of these are bigger, meant for the hanger and kingpin. Even if some trucks come ready out of the box, you’ll usually need to assemble them yourself. After setting them up, tighten the trucks using a skate tool or a 3/8 inch wrench. Tightening them in an “X” pattern is recommended to avoid any damage.
How tight and aligned your trucks are, matters a lot for how well your skateboard works. Be careful not to make the kingpin nut too tight, as it may harm the bushings. The trucks should be firm yet should still turn smoothly. Also, your truck axles should match your board’s width. This helps keep your ride stable. After mounting, check the wheels turn without trouble. This confirms everything’s set right. For better adjustments, a skate tool is very handy.

I’m John Peterson, a passionate skater, blogger, and lifelong enthusiast. I’ve been skating for over 9 years and have gone on to write a blog dedicated to the sport of skating and its culture. Through my blog, I strive to share my knowledge and experience of the sport with all who are interested. From beginner tips, tricks, and equipment reviews to interviews and event coverage, I cover it all. So read my blog as I explore the wonderful world of skating!